Why is drawing from life important?
While it is exciting to draw fanart of your favorite Overwatch characters, all these characters were based from life. Even mythical creatures like dragons and griffins were based off existing animals in real life. It is also very difficult to create a stylized reproduction of something in life if you do not understand what it looks like in life. Even if you’re only interested in drawing in one type of style, understanding how forms look like in certain lighting will help add another sense of believability to your works.
What does an artist have to gain from drawing from life?
Drawing from life helps build your understanding of form, value, and texture because when you look at anything from life, everything has a shape to it and everything reacts to light in various ways depending on what the object is made out of. For example, a rock with rough textures surface will have more matte even values than a shiny gold plated piece of jewelry, but most artists will not be aware of this until they study various objects and their properties.
How do I approach drawing from life?
One of the first things I do is pick a place I want to go to. This can be at a local park, my favorite coffee/boba shop, the mall, the library, or even a metropolis location with lots of buildings. Make sure to stay hydrated, bring protective wear, and set up your working area under a shaded area if you’re going to be outdoors and the weather is hot.

Generally if I am going to be outdoors, I carry a folding chair with me. Dollar stores like Daiso carry smaller folding seats that you can store in your backpack, however those have a weight capacity of 150 pounds so I would be mindful of that. The folding chair pictured has a max weight capacity of 300 pounds and I only purchased it from Walmart for only $20. It also has a bag that I can sling on my back to carry with me for long hikes. If you don’t like to travel heavy, a towel will also work for nature settings.
Many people use drawing easels to stand their drawings upright while they work, others use a clipboard with paper and prop it on their lap. Most standing and sitting easels at an art store will you anywhere from $30 to $500, depending on what you want to draw. If these options are too costly for you, James Guerney talks about how he made his own art easel for his moleskine sketchbook using pieces of plywood, hinges, and a tripod mount, which is a very cost-effective way of building your own easel if you’re good with a drill. In this demo, I used an old portable music stand to prop my sketchbook on since it was lightweight and easy to carry.
I recently ordered the Etchr Art Satchel off of Kickstarter so stay tuned for reviews on that in the future. It has the same tripod functionality as Guerney’s DIY easel, except the Art Satchel also doubles as a backpack and table easel if you’re sitting at a table and want to draw on a propped surface. It is a bit pricey, but if you’re looking for a good backpack/easel/all-in-one, it may be worth the investment. If none of the easels fit what you are looking for, I would strongly consider giving this one a try. Many professional artists left reviews on this product and the reviews have been overwhelmingly positive. Even though the kickstarter ended, they are still taking pre-orders if you want to get the product.

I love plein air painting, so I carry a 5x7 sketchbook that is mixed media compatible so I can draw or paint in it. One of my goals is to make drawing a daily habit and by having a sketchbook that fits perfectly into my purse, it helps me draw anywhere at any time. As you can tell, there is a lot of wear and tear on this sketchbook. This is perfectly normal if you are drawing consistently and carry your sketchbook everywhere you go. You need to treat your sketchbook like it’s your wallet, if you want to make drawing a habit. If the outside of your sketchbook doesn’t look like mine, you either need to carry it around with you more or you need to use it more. Also don’t forget to include your name and contact info in the cover of your sketchbook. It would be dreadful if you were to lose your sketchbook somewhere and the person finding it had no way of finding you.

These are some of the supplies I use when I am drawing. I really enjoy using ballpoint pens because they’re cheap, easily accessible if you forget your pencil bag, and just as pressure sensitive as a regular pencil. One of the reasons I draw frequently with pens is because it forces you to draw loosely without having to constantly go back and erase your imperfections. I also use regular pencils when I draw outside, but it’s mainly when I want the option of erasing parts of the drawing or if I am working with paint and I want to block in the drawing lightly with a hard pencil.
Optional: I also keep my belongings in a Loctote Flak Sack, which can be purchased for roughly $150, or cheaper if you catch the sales. It has a combination locking mechanism and is made out of cut-resistant fabric, which is great if I’m sketching alone and don’t want anyone stealing my belongings. It’s not required, but it does come in handy if you plan on drawing outside by yourself a lot and are worried about theft. It is a must if you work digitally a lot from life alone.


Before I get started on my drawings, I like to do a few warm up sketches of nearby objects. In this case, I am at one of my favorite parks and there are a lot of leaves nearby so I decided to draw some of those. Something that also helps me is drawing nearby objects, preferably things that will be in my composition so I can get some studies of them done. Don’t be afraid to have or make bad drawings on your page. There’s a quote somewhere on twitter that says:
“Your shittiest sketchbook page is still better than the days you decided not to make anything”


Sometimes when I am tackling super organic shapes like a tree, I utilize the practice of seeing negative shapes a lot. For instance in this image, I saw a silhouette of a dog in the tree’s silhouette so I drew the negative shape the way I was seeing it. Negative shapes and blind contours are a great way to dissect overwhelmingly organic shapes.
Set your intention
When you’re approaching your plein air drawings, I would highly recommend you think about what your goal is for the drawing. Is it to have fun? To create pieces for your portfolio? To improve in a certain area of your drawing? Having goals in mind will help you get a lot out of your drawing sessions, whether you are there for an hour or two hours. I also find it easier to draw with a group of other artists so that I will be more motivated to focus on what I am doing. Also depending on where I am sketching, some locations are less safe to draw alone than others so it makes me feel safer to draw with a buddy.
In this case, I want to have a better understanding of the location so I am drawing pieces of the location with the intent of learning the shape of the objects and how they fit into the overall composition. Since these drawings are drawn with the intent to study them, it isn’t important to me whether they are separate drawings or not.

Planning the drawing
Before I tackle any drawings from life, I always try to thumbnail it, plan my composition, focal points, and values. I do this by establishing the frame and size of the drawing on my paper, then framing my view using a viewfinder, which is a cutout square that you can use to frame your ideas.


Rule of Thirds

I wanted to get better at composing my images, so I laid in a grid that is divided into thirds. The Rule of Thirds is commonly used in photography, but can also be a great tool in balancing in your compositions through any 2D or 3D medium. We can go into more depth on Rule of Thirds if there is enough interest.

Some thumbnails of location studies at the park to help me figure out what to draw and to warm me up on composing an image.
I cannot stress enough how important it is to plan your drawings. This is what the old masters do when they do a painting. They create studies on location, then take what they learned from the study to create a finished piece or use it as reference for any client commissions. Some old masters will do a line drawing for a quick study, others will go and do a full tonal study. It’s up to you on what you want to do, as long as it’s in line with your goal for the session. An example of this is a comparison between a tonal sketch and a final painting by William Trost Richards of the Atlantic City Ocean.


Creating the lay in
The lay in can be whatever you want. It can be a tonal block in, a gestural scribble, anything that helps you place a form on your paper. I chose to block in my form using a pencil so that I can figure out the composition of the image and move elements around to create a compositionally appealing flow of shapes. This also allows for easier erasing in case I am not happy with something. I also work this way with paintings before laying in my tones. Since I chose to work with pen and marker for this one, I will skip the tonal lay in and go right into blocking in my drawing using my pen. I am also taking my time during this phase because one of my goals in this drawing is to build up my observational skills while creating something that is compositionally pleasing to the eye.


Once I am happy with the pencil lay in, I begin blocking in my drawing using my medium of choice. Like the pencil drawing, I worked from left to right to avoid smudging my pencil and ink drawing. I am right handed and since it was a bit hot today, my hand was a bit more sweaty than usual. I normally keep a paper towel or another sheet under my drawing hand for this reason, but most of the time, I won’t always have one on me so I just try to work from left to right, This tends to be one of the slower phases of drawing because this is the part where I am adding a layer of detail to the pencil lay in. The lay in gives me a compositional foundation to detail my drawing around and I can easily erase out parts that do not help my drawing during this process. As you can tell, I lowered the dip of the ground plane a little bit more to preserve the accuracy of what I was observing and to give the ground plane more variation so it isn’t just a line cutting through the page.

Give yourself a break
If for some reason, you need to take a break at any point in your drawing, stop and take a break. There is no need to sacrifice your well being for a drawing. For this purpose, I always have my phone on me with a pair of headphones and will take a break to either watch inspirational videos on youtube, listen to some music, or just browse around to get my mind off the piece. Sometimes I will draw with music on so that I can get into a rhythm or get into the mood of the piece I am drawing, which is generally great when I am doing concept work from life, but I often find that music can distract me from focusing on my drawing so I tend to draw without music.
During the inking phase for example, I was stumped on how to tackle the light and shadows of the water ripples and I didn’t feel like the grey marker across the ripple was creating the effect I wanted so I stopped to take a break, observe the water for a little longer, then continued with the drawing. Sometimes focusing on other parts of the drawing except for the water ripples was also considered taking a break while still progressing on the drawing. I actually do this frequently when I am stumped on an illustration. I will stop and work on another illustration of equal priority, then come back to tackle what I was originally working on.

Conclusion
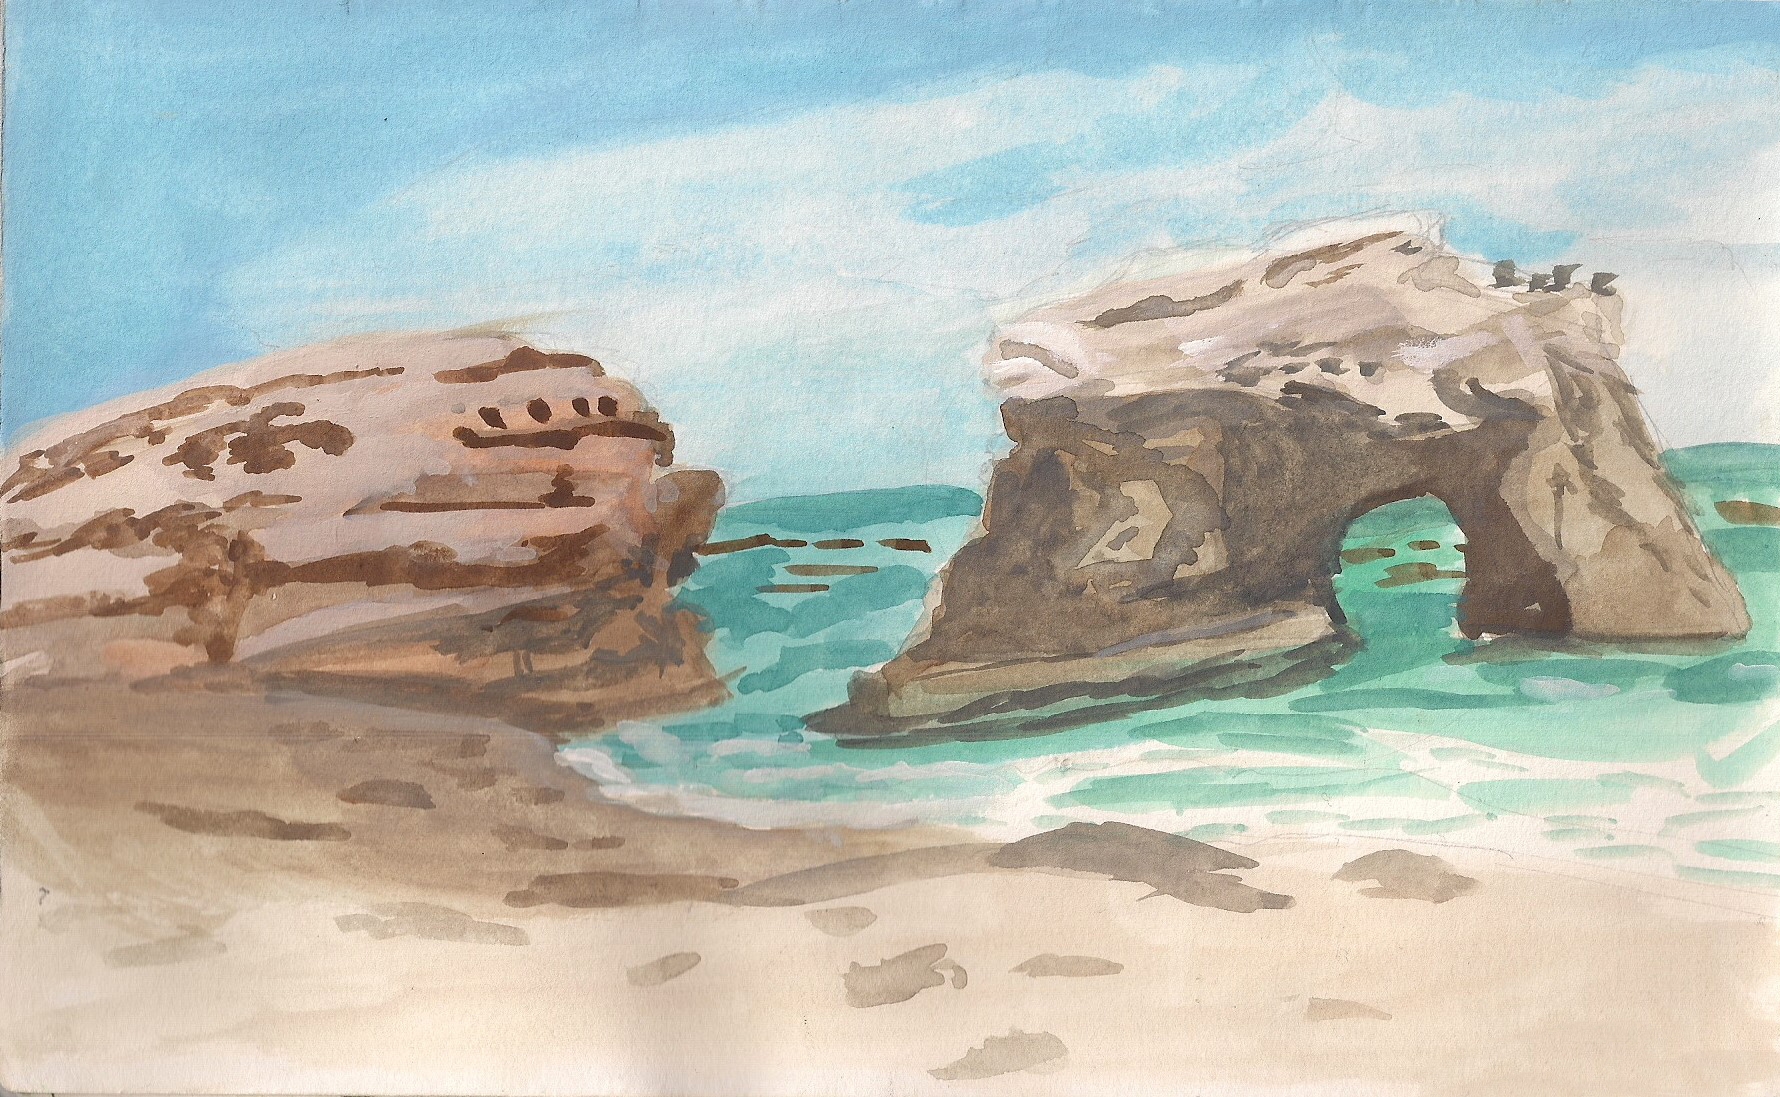
The final drawing. As you can tell, there are areas that are working really well and areas that could use more improvement. Your first attempts at drawing from life will not always produce your best drawings and that’s okay. It’s like starting to learn how to play baseball. Most beginners will not hit a homerun on their first try or on every single try, but the more they practice, the more home runs they will hit. You will have pages in your sketchbook filled with drawings that you feel are your worst, but I guarantee that if you make drawing a habit every day, pretty soon your sketchbooks will be filled with more great drawings than mediocre.
I remember when I was in college and had to fill in 80-pages of a 6 x 9 sketchbook with drawings in a 4 month time span. The requirement was that all the drawings had to be drawn traditionally from life. Completing the sketchbook within the deadline required a lot of daily drawing and time management to keep up with the deadlines and switching up my techniques to keep drawing from life fun.
There is no one single way to approach drawing from life. This is how I personally approach my on location studies, but this is what helps me out. I highly encourage you to try out different ways to approach drawing and see what works for you and pretty soon, you will have a sketchbook full of great drawings.